

If you already know ConstraintLayout from the XML world, you do not have to throw that knowledge away in Jetpack Compose. Google ships a constraintlayout-compose library that gives you the same anchoring model (createRefs, constrainAs, linkTo) inside a @Composable. One honest caveat for 2026 though: in Compose, ConstraintLayout is a readability tool, not a performance tool. The flat-hierarchy speed argument that made it the default in XML does not carry over, so reach for it when a layout gets awkward to express with Row, Column, and Box, not by default.
I first wrote this post in 2021 when the Compose version of ConstraintLayout was still a release candidate. The API has held up well since then, so most of this still applies. I have refreshed the framing around when to actually use it and cleaned up the setup.
Why keep using ConstraintLayout in Compose?
For years, ConstraintLayout was an effective way to create complex UI for our Android applications. With ConstraintLayout you were able to build a complete screen without nesting the old-fashioned layout containers such as LinearLayout, RelativeLayout, and the rest. A flat view hierarchy was faster to measure and lay out, so it became the default for anything non-trivial.
When Google released the first stable version of Jetpack Compose, every developer suddenly had to explore, learn, and adapt to a new way of building UI. For developers like me, giving up ConstraintLayout felt like a big No-No, and relearning layout from scratch was not something I was looking forward to.
The Compose team clearly understood this, because they shipped a library that lets you use ConstraintLayout inside Compose. Happy days. The important thing to know in 2026 is the reason the tool exists has shifted. In the View system, ConstraintLayout earned its place partly on performance: flattening a deep hierarchy meant fewer measure and layout passes. Compose handles deep layout trees efficiently on its own, so that particular win does not transfer. What does transfer is expressiveness. When you have a handful of views with relationships like “center this to the parent, then hang that one off its bottom edge,” constraints read more cleanly than a stack of nested Box and Column modifiers.
Quick disclaimer: I am not saying you cannot build complex UI with plain Compose components such as Column, Row, and Box. For most screens those are exactly what you want. I reach for ConstraintLayout when the relationships between elements get fiddly and I would otherwise be nesting containers just to position things.
How to add ConstraintLayout to a Compose project
- Open your module
build.gradle(orbuild.gradle.kts) where your other Compose dependencies live. - Add the
constraintlayout-composedependency. Use the current stable version (1.1.1 as of mid-2026, released Feb 2025):
implementation 'androidx.constraintlayout:constraintlayout-compose:1.1.1'- Confirm the latest stable version on the official releases page before you sync: https://developer.android.com/jetpack/androidx/releases/constraintlayout
- Sync Gradle, then import
ConstraintLayoutfromandroidx.constraintlayout.composeinside your composable file.
That is the whole setup. Note that this is a separate artifact from the classic androidx.constraintlayout:constraintlayout you used in the View world, so adding one does not give you the other.
How do you translate XML ConstraintLayout to Compose?
The simple answer: it is pretty much the same, and at the same time it is quite different, so let me explain.
The concept behind it is identical:
“left of my view to parent left, and top of my view to bottom of another view…”
But you now express that in Kotlin, and it can feel like you are building old-fashioned views programmatically:
val textView = TextView(context)
.... code ...
addView(textView)
That comparison is only about the mental model, not the actual API. In a few examples you will see it is not hard to get used to, and after a handful of lines you will be up and running. Let us start from the basics.

A bare container looks like this:
// In XML
<androidx.constraintlayout.widget.ConstraintLayout>
    // Code
</androidx.constraintlayout.widget.ConstraintLayout>
// In Jetpack Compose ConstraintLayout
@Composable
fun ConstraintCompose() {
ConstraintLayout {
// Code
}
}If you want the ConstraintLayout to match the parent on width and height:
// In XML
<androidx.constraintlayout.widget.ConstraintLayout
    android:layout_width="match_parent"
    android:layout_height="match_parent">
    // Code
</androidx.constraintlayout.widget.ConstraintLayout>
// In Jetpack Compose ConstraintLayout
@Composable
fun ConstraintCompose() {
ConstraintLayout(
modifier = Modifier
.fillMaxHeight()
.fillMaxWidth()
) {
// Code
}
}Simple and easy, right? Now let us get to the juicy part.
How do you constrain two views to each other?
In this example we create two views and position the second one relative to the first. In XML you assign IDs and reference them from the constraint attributes:
// In XML
<androidx.constraintlayout.widget.ConstraintLayout
    android:layout_width="match_parent"
    android:layout_height="match_parent">

    <TextView
        android:id="@+id/text1"
        android:layout_width="100dp"
        android:layout_height="100dp"
        android:background="android.R.color.cyan"
        <!-- This centers the view in parent -->
        app:layout_constraintBottom_toBottomOf="parent"
        app:layout_constraintLeft_toLeftOf="parent"
        app:layout_constraintRight_toRightOf="parent"
        app:layout_constraintTop_toTopOf="parent"
        android:text="FIRST"/>

    <TextView
        android:id="@+id/text2"
        android:layout_width="100dp"
        android:layout_height="100dp"
        android:background="android.R.color.green"
        <!-- This centers the view below text1 -->
        app:layout_constraintStart_toStartOf="@id/text1"
        app:layout_constraintEnd_toEndOf="@id/text1"
        app:layout_constraintTop_toBottomOf="@id/text1"
        android:text="SECOND"/>

</androidx.constraintlayout.widget.ConstraintLayout>
In Compose the IDs become references you create with createRefs(), and the constraints move into a constrainAs block on each composable’s Modifier:
// In Jetpack Compose ConstraintLayout
@Composable
fun ConstraintCompose() {

   // these are the id references (very important)
   val (text1, text2) = createRefs()

   ConstraintLayout(
      modifier = Modifier
          .fillMaxHeight()
          .fillMaxWidth()
   ) {
      Text(
          modifier = Modifier
              .size(100.dp)
              .background(color = Color.Cyan, shape = Shapes.large)
              .constrainAs(text1) {
                  centerTo(parent)
              },
          text = "FIRST"
      )
      Text(
          modifier = Modifier
              .size(100.dp)
              .background(color = Color.Green, shape = Shapes.large)
              .constrainAs(text2) {
                  top.linkTo(anchor = text1.bottom)
                  start.linkTo(anchor = text1.start)
                  end.linkTo(anchor = text1.end)
              },
          text = "SECOND"
      )
   }
}
A few things map directly. createRefs() gives you the equivalent of XML IDs, and you must create them before you reference them, so declare them at the top of the composable. centerTo(parent) is the shortcut for the four “center in parent” constraints you would otherwise write by hand. And top.linkTo(text1.bottom) reads almost exactly like layout_constraintTop_toBottomOf="@id/text1", just as a method call against an anchor instead of an attribute string.
The result looks like the screenshot below.
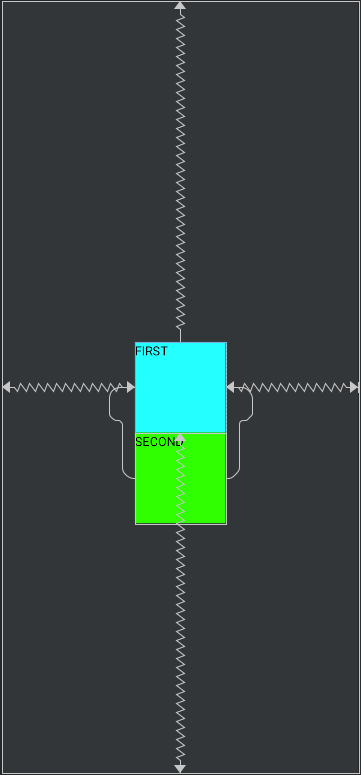
As you can see in this small example, ConstraintLayout for Jetpack Compose is more concise. With less code you achieve the same result you did with pure XML, and you get it type-checked at compile time instead of resolving string IDs at runtime.
Frequently Asked Questions
Is ConstraintLayout still recommended in Jetpack Compose in 2026?
It is still supported and perfectly fine to use, but the reasoning changed. In the View system it was recommended largely for performance, because a flat hierarchy measured faster than deeply nested views. Compose handles deep layout trees efficiently on its own, so that performance argument does not carry over. Use ConstraintLayout in Compose when it makes a layout easier to read and maintain, and use Row, Column, and Box for everything else.
How do XML constraint IDs work in Compose?
You replace android:id references with references created by createRefs() (or createRef() for a single one). You then attach each reference to a composable through Modifier.constrainAs(reference) { ... }, and inside that block you describe the constraints. Create the references before you use them, because Kotlin evaluates them top to bottom.
What replaces layout_constraintTop_toBottomOf in Compose?
The anchor API. Inside a constrainAs block you write top.linkTo(anchor = otherRef.bottom), which reads the same as the XML attribute. Each side (top, bottom, start, end) exposes a linkTo that takes the anchor you want to attach to. For centering there are helpers like centerTo(parent) and centerHorizontallyTo(parent).
Do I need a separate dependency for ConstraintLayout in Compose?
Yes. It ships as androidx.constraintlayout:constraintlayout-compose, which is a different artifact from the classic androidx.constraintlayout:constraintlayout used with XML views. Add the Compose artifact next to your other Compose dependencies and check the releases page for the current stable version.
This mixes perfectly with the rest of Compose, so you can drop other composables straight into a ConstraintLayout and constrain them the same way. I will cover that combination, plus guidelines and barriers, in a follow-up.
Happy coding.
David Cruz davthecoder.com
Loading comments…